Don’t rub your eyes
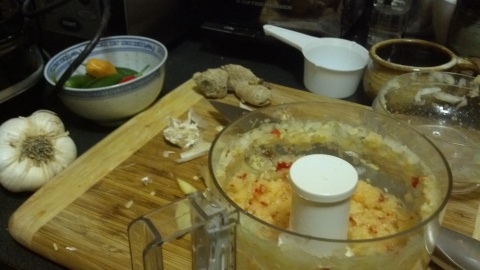
Hello! Whisk Like a Motherfucker is here with a righteous technique used here to make a flavoring paste for an Indian daal but let me tell you friends, this is also the manner in which you make a Thai curry paste and I’ll tell you how to do that too (if you want to shop for the ingredients). I’ll even unlock the secrets to the different colors of Thai curry pastes. But first, check out my mise en place. That’s right! Oh, you think it’s a mess. Well don’t sleaze on my mise!

Ingredients
2 cups lentils
1 big knob ginger, peeled and roughly chopped
1 small onion, roughly chopped
4 cloves garlic, peeled
1 or more chili peppers of your choice (we used 1 Inferno pepper from our garden)
1 small can of coconut milk (or half of a larger can) NOT the low-fat stuff
1 small can of tomato paste
2 Tbsp of cumin powder or to taste
1 tsp of cinnamon powder
1/2 tsp clove powder OR 2 whole cloves
1/2 tsp ground cardamom or more to taste
1/2 tsp cayenne pepper or to taste (MORE you wussies!)
1/2 tsp ground black pepper or more to taste
salt to taste
Step 1 of this dish is not pictured here. You must start to cook 2 cups of lentils of your color choice on the stove.In a big pot. With some salt. The red ones might get a bit mushy. My favorite are horse gram (really a kind of tiny pea) but they take forever to cook, even with soaking so I used brown lentils. We’ll be adding ingredients to the cooking lentils as we go and they’ll cook down.
Step 2 is to take your onion, ginger, chili, and garlic and put it in a food processor or an AWESOME MINI FOOD PROCESSOR if you own one (because it is perfect for things like this) and grind them into a chunky watery paste. See below:
Step 3: Heat a small saucepan over medium-high heat and cook the flavoring paste until golden and most of its liquid has evaporated. See below:

Step 4: Add the flavoring paste to the lentils along with the tomato paste and coconut milk and allow it the mixture to cook down. Add more water if necessary. Lentils should be falling apart and creating their own “gravy”. Approximately 15-20min
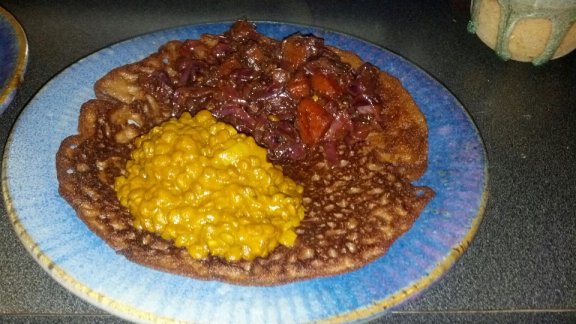
Serve over rice or injera.
To transform the idea of the flavoring paste into a Thai curry you have to change out some of the ingredients.
Always found in a curry paste:
-lemongrass, chopped
-galangal, chopped (a relative of ginger, looks like ginger, smells more citrusy, MUCH harder to cut, find at an Asian grocery)
-kaffir lime leaves (find at an Asian grocery, if you can’t find substitute with lime peel)
– cilantro, leaves and stems/roots
– garlic
– shallots (sub white onion)
– chilies
– toasted coriander pods, white pepper pods, cumin pods all ground together
– soy sauce (fish sauce would be traditional here but not if you’re vegetarian)
Curry color variations:
Green Curry: fresh green Thai Bird Chilis and lots of cilantro
Red Curry: dried red chilies and less cilantro
Yellow Curry: curry with the addition of tumeric powder
Massman Curry: curry made with the addition of a nut butter. This curry typically includes potatoes!
Panang Curry: a mild red curry
Directions
1) Place ingredients from the main curry and your color curry in a food processor and turn on machine. Stream in a small amount of water until the machine starts to grind well. Let machine work, stopping every few minutes to scrape down the sides. Allow to process until a paste forms. This makes enough for 2 batches of curry.
2) Heat a can of coconut milk in a saucepan on the stove, add half of your paste, mix with a fork, and bring to a simmer for a few minutes. Use to sauce a stirfry of your choice and it will be AWESOME. YEAH.
Don’t rub your eyes when doing any of this.
Between a Rock and Terrible Pictures
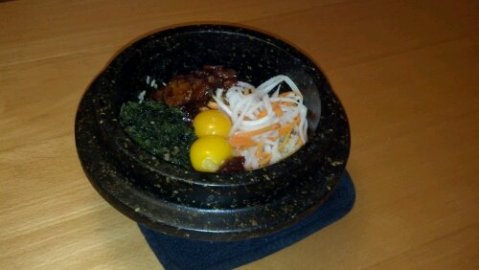
This my friends, is a rather blurry photo of my Korean stone dolsot bowl filled with some bim bim bap. Bim bim bap is the name of the dish and when served in a dolsot it’s called Dolsot bim bim bap. It’s blurry because the bowl had been sitting in a 500° oven for an hour and I had only my cell phone handy and those yellow things you see on top are egg yolks. Everything is cooking fast in the hot bowl… no time to get a better camera.
Cooking with the dolsot is easy. Cook some rice (we always do short-grain brown in our house). Make a variety of small korean/asian type items (whatever is around) to go on top. Think bbq tofu or seitan (the meat eaters would have ground beef or bbq pork but we won’t go there) and slightly pickled or stir-fried vegetables. An egg yolk per a person is traditional and hoisin sauce can be delightful. The only definite requirement is Korean gochujang pepper paste. You cannot substitute for this.

So, you take your dolsot and put it in the oven at 500°. You start a pot of rice. You cook your veggies and/or tofu. You separate your egg yolks. Your rice is probably done about an hour after you started your oven. Take out the dolsot, drizzle in some sesame oil and brush around with a silicon or pastry brush. Transfer the cooked rice into the dolsot. Lay the various toppings in attractive wedges around the dolsot leaving the center clear. Add a big dollop of gochujang, another of hoisin if you want it. Add the egg yolks in the center. Top with seaweed or sesame seeds if you desire. Allow to sit for a few minutes to allow the rice to get crispy on the bottom (one of the main characteristics of the dolsot). Then, break the eggs with your chopsticks and stir everything together allowing the egg yolks to cook in big streaks along the stone bowl edges (the other main characteristic of the dolsot). Everything cooks together and you serve yourself out of the dolsot. Top with kimchi.
Clean the dolsot by scouring it with kosher salt and a kitchen towl when warm to remove food particles and then rub the inside with vegetable oil. If prepping a new dolsot season it with vegetable oil after heating in a hot oven much like seasoning a cast iron skillet.
Last night we stir-fried sesame-garlic kale from the garden (it lives! in January!), did a slight BBQ on some water chesnuts with some date syrup (hey, it was around and I like it) and some gochujang. We had some leftover pickled shredded daikon and carrot from the asian market that I bought for bahn mi sandwiches over a week ago and it had to go, so into the dolsot it went. Stirred together and I think this was one of P.’s more favorite Asian meals. He’s an Italian guy at heart and I’m just a California gal.
For more info and much better pictures see this informative blog post:
http://www.thekitchn.com/recipe-korean-dolsot-bibimbap-with-vegetables-and-tofu-164939
You really can’t buy a dolsot online (and shipping on the heavy stone would be HELL). I picked mine up for about $20 at an Asian market. It has a matching lid and is worth the trouble of maintaining it. Which is not much.
Holiday cheer? I mean pasta.
I suppose these might be seasonal.
P. and I are working on our pasta-making super-team. I make the dough, he rolls the pasta. If it’s a filled pasta I fill and cut it while he keeps rolling. Then we cook the pasta while I cook whatever the pasta is going in. Supposedly he cleans the kitchen and feeds the cats while it finishes cooking. Supposedly a bottle of wine is opened and poured at some point during this process too. There is no arguing over someone rolling pasta too fast or filling pasta too slow or anything like that.
The major problem of course is that if the original dough is a bust it can be a major problem. Entire dinner explodes problem (no dinner). Our fail safe plan is that we don’t cry, we just order pizza, but it’s harder than usual not to cry over handmade pasta.
I tried to make this pasta once before. I had visions of vivid purple pasta filled with bright green filling. It would be a lurid but cheerful combination and let’s face it, the weather is pretty grey. I found a Martha recipe where she grinds up an assortment of veggies and puts them into an assortment of pastas before moving onto things like turtle-pasta, hamster-pasta…. nevermind. If Martha can do it I can try to do it too.
I bought a giant beet at the farm market. I baked it until it was mush, I pureed it in my food processor…. and it was only pink! I tried to make the dough. Not only was my dough a bust (not enough flour, waaaaay too soft and sticky) but because my beet was pink and not purple my soft dough turned into an odd fleshy wrinkly mass, especially as it settled into folds caused by the saran wrap. It was oddly cadaver like. I needed Dr. Frankenstein to come along and bring life into it. P. tried hard to work enough flour into it but I’m surprised he didn’t kill our pasta machine. The flesh ball went into the trash.
This time I got plain old supermarket beets and they were plenty purple. I added plenty of flour to the dough and it all worked out. Though it turns out, well, you boil beet pasta and it just turns pink anyway. Bust-a-thon for this one. Pretty while it lasted though.
The pasta itself is agnolotti; a sort of rustic ravioli. I was very sick of the ravioli press and angnolotti are super-trendy at places like, oh, The French Laundry these days. Pretty easy and no fancy equipment needed, just a pastry cutter.
The filling is a standard mixture of greens and ricotta from the food processor and is remarkable only because the greens are turnip greens (my Encyclopedia of Pasta says this is traditional for Sardinian agnolotti as opposed to agnolotti from other places in Italy which can be filled with a variety of things up to and including donkey meat, which is not an acceptable item in our household) and because I used the rest of the turnip in the actual pasta dish. Going for a nose-to tail use of the turnip!
Anyway, I keep getting asked if this blog is still alive. See the problem? There’s too much information.
Want some pictures?


Digging In
It is change of seasons and I have not done a good job of documenting the garden.
The sunflowers flourished, seeds were ravaged by squirrels, and have been cutdown.
Our vineing flowers bloomed shockingly late along our fence line contrasting with the yellowing plants. Nasturtiums (all kinds), morning glories. They climbed the giant sunflowers, piled at the feet of mexican sunflowers.
My initial fear that our tomatoes were doomed was soothed and we spent the bulk of the summer trying in vain to build structures big enough to support the tomato vines. We have plans for next year. In spite of the autumn chill the plants have continued to produce, though it’s now time for Patrick’s Dream Green Tomato Salsa (ask him, it’s his dream).
We learned to can and have 12 jars of tomato sauce, 3 jars of tomato juice, 7 jars of pickled jalapenos (ask him! I have NO idea what you’re supposed to do with them), 2 jars of pickled okra (yum!), 7 jars of ketchup, 3 jars of garden salsa. A pressure canner would be a great holiday gift in order to allow us to experiment without killing ourselves with the botulism (hey parents!).
Herbs were either replanted and brought inside or cut and dried. I will crumble the dried ones into jars this weekend.
We have a single beautiful string of dried red peppers that we’ve learned is called a “ristra”. As with last year’s string we’ll crush the peppers into a hot pepper powder that will last us all year.
The chard refuses to die. We have had chard gratins, chard pizza, chard saag, chard soup, chard quesadillas, chard ravioli, chard pasta sauce, and several chard tarts. OMG IT WILL NOT DIE. I have clear cut it several times. Apparently it grows happily over the winter in the snow. Go figure.
The kale is infested with something but seems happy enough otherwise. Peppers are still on the plants but are kind of blackened. I’ve run out of steam for them. The strawberries will probably try to take over that box next year.
We certainly got bang for our buck with the eggplants. These were the last of them. The plants were still flowering but the fruits had stopped getting big in the cold air:

No bigger than 4 inches.
This weekend we will get a pitchfork and a bale of hay. We will pull out all the plants from the garden except the chard (DARN). We have four heads of hardneck garlic that we’ll break into cloves and plant in one of the beds. Each clove will grow into it’s own head of garlic. Hardneck garlic is so strong that we should have enough to last us much of next year! We will cover the garden beds with the straw in preparation for the winter. In the spring we will have garlic scapes from the hardneck garlic heads to enjoy.
Apparently over the winter it’s common for gardeners to spend time pouring over seed catalogs, dreaming of next summer’s garden. I’d always sworn that gardening was a hobby I would avoid. On purpose. Never ever. It lead to dreaming, more cooking, canning, big messes, and everything else you’ve seen here. Yet here we are. The garden was the hobby that Patrick and I started together on purpose, a hobby that neither of us knew anything about. It was something that we could build together, learn about together, literally grow together. Look how successful we’ve been? Look how much dreaming we’ll do together over the winter.

late season tomatoes

hight
I already have seeds for Moon and Stars Watermelon.
The Garden Giveth

Bounty comes at last.

And we taketh away.
If you haven’t tried grilling pizza yet, you should really get on it. It’s SO EASY!
This post is not about making pizza dough, in fact we bought our dough at one of our favorite pizza places. It cost $1. Most pizza shops will sell you a doughball if you go in and ask nicely, prices vary since it’s rarely on their regular menu.
This post is not about stretching pizza dough.
Get your grill as hot as possible and brush the hot grill with a low-burning oil (canola, corn, soy, etc). Stretch your dough out and flip it onto the hot grill. This is scary! It’s hot! (I recommend tongs)! And you only get one chance! Brush the exposed side with some more oil, shut the lid, and let it cook until you smell burning and the bottom is starting to darken and char.
Flip your pizza over and as fast as possible (over the heat) top it with your choice toppings. Move fast! Shut the lid and cook until the bottom starts to darken and char. Remove from heat. That’s it.
Because of the speed of cooking on the grill you can’t actually cook any of the pizza toppings onto the pizza as you would in a normal oven. That means that all your toppings must be pre-cooked in every possible way.
Put whatever you desire on your pizza, but the one viewed here is nettle pesto (from earlier this spring), summer squash from our garden that was cooked in a little butter and pepper, and brie cheese. We had a second pizza of chard from the garden (sauteed in garlic and butter), tomato sauce, and topped with the rest of the brie.